Efficiency Through Consistency in Lightroom Classic: Part 2
Following up from last week’s post on efficiency through consistency I’ve got a few more tips to help speed you on your way.
Consistent Metadata
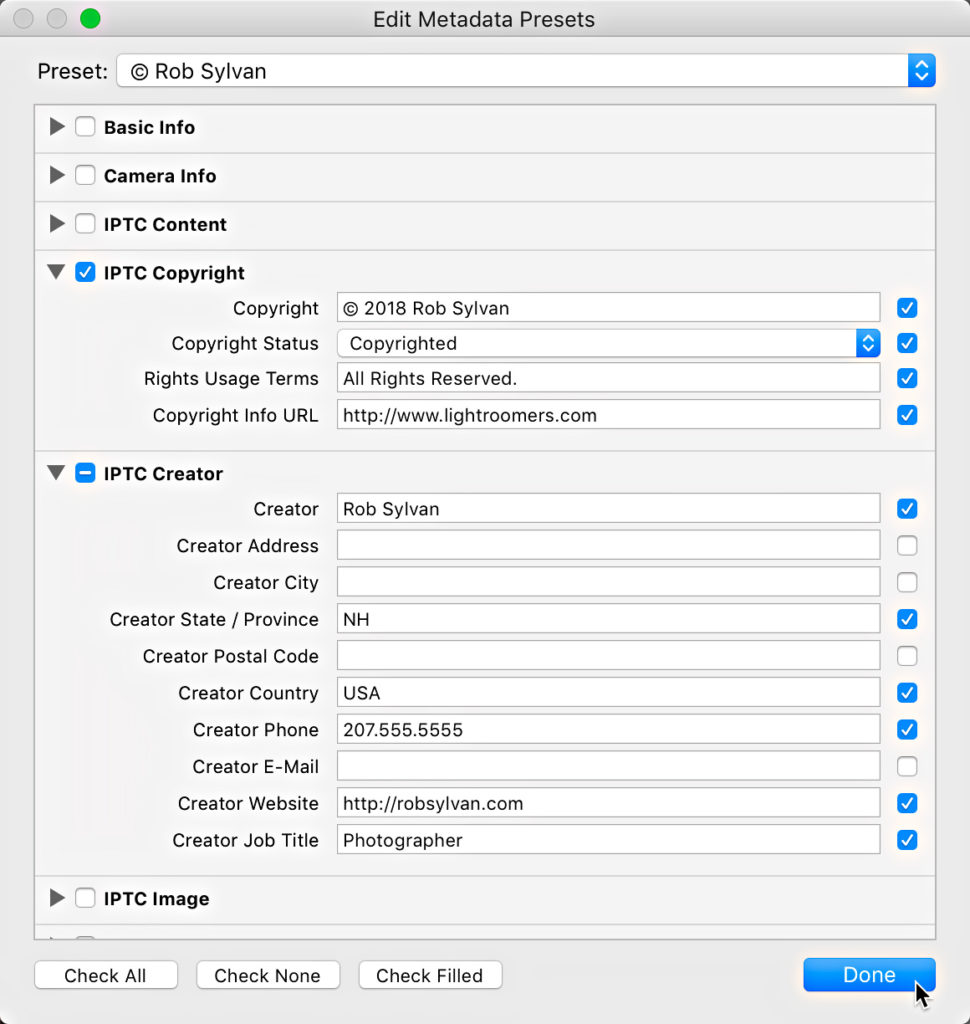
A metadata template containing your core contact and copyright information is another way to ensure you are consistently applying the same information to all of your photos. Once created this can easily by applied during import via the Apply During Import panel. You can create a Metadata template from the Import screen by clicking the Metadata drop-down menu and choosing New, or you can access the same editor from the Library module by going to Metadata > Edit Metadata Presets.
Once the Edit Metadata Presets dialog is open you only want to enter information that apply to all photos equally. For me this includes all of the IPTC Copyright and IPTC Creator fields (with the exception of my street address). The one thing to keep in mind with this template is that you only want to check the box next to a field you are customizing with your own information, otherwise leave the boxes unchecked to retain any existing metadata that may exist. I have seen some people make the mistake of checking the box for the GPS field only to find that this makes Lightroom ignore the data from that field. Similarly, make sure there is no unwanted information (like keywords way at the bottom) that you don’t want to include by accident. Once configured (and double-checked), click the Preset drop-down menu and choose Save current settings as a new preset to save it for reuse.

Consistent Develop Starting Place
With your basic file management and metadata under control you can shift your attention toward creating a consistent default setting for your raw photos that can help your photos look more like they do in the camera right out of the gate and save you a lot of clicks down the road. This also allows you to save any Develop presets you might want to apply during import for more creative pursuits. I have a whole post devoted entirely to this topic, so go check that out!
Consistent Output
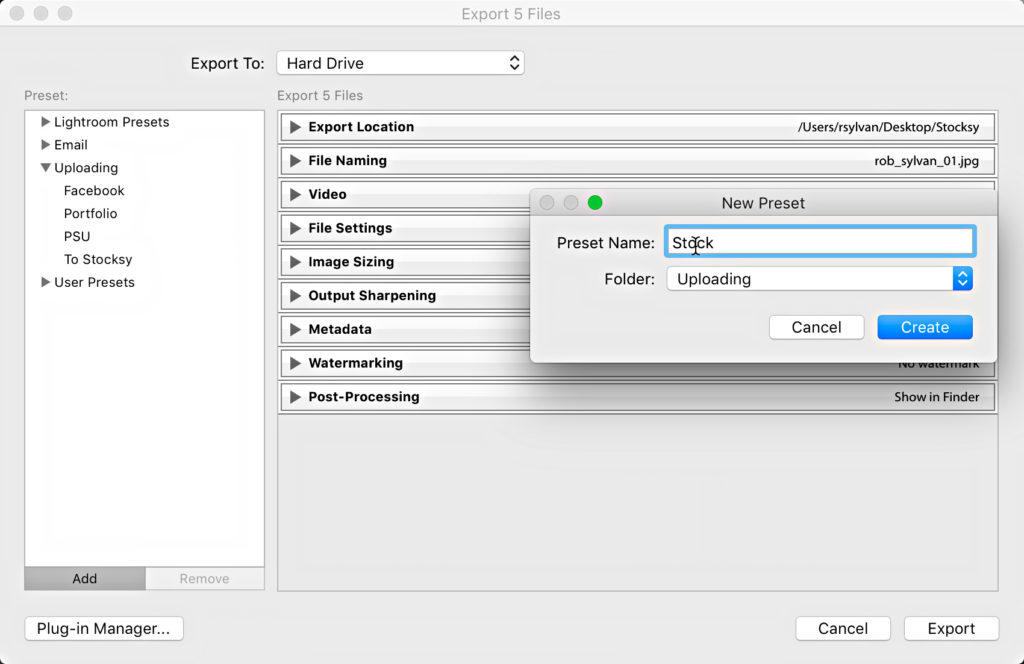
You’ve brought your photos into Lightroom’s care, you’ve processed them with your consistent style, and now you’re ready to send them out into the world. You can save yourself time here too by creating custom export presets that allow you to consistently reproduce the same results during output. Like me, you probably export copies for a wide variety of reasons, but there are probably some core destinations that you re-visit frequently, such as a regular client, an online lab, a stock agency, some photo sharing site, your blog, etc. In each of these cases the photos will vary, but the specifications the photos need to meet for each situation will stay the same. It is these cases that will benefit greatly from export presets. For example, when I export copies destined for Stocksy United, a stock photography co-op I belong to, I have an export preset that controls every parameter so I know that each submission is consistent with the previous ones. Here’s how to create your own:
Step One: Select the photos for export and click the Export button.
Step Two: Configure the Export dialog to contain only the settings needed for this specific output destination.
Step Three: Click the Add button under the preset window to open the New Preset dialog box and give it a meaningful name. Optional: Store the preset in a folder for better organization of your presets.

The best thing about creating export presets is that once you have them you can skip the Export dialog completely simply by going to the File > Export with Preset menu and selecting your desired preset. Lightroom does the rest just the way you configured it (While in that menu, note the export with previous shortcut if you do lot’s of similar exports without changing settings).
As you can see, from import to export, and everything in between, there are opportunities to leverage Lightroom’s presets, templates, and customizations to save you time every step of the way. What else do you do?
Bonus tip, check out my previous post with 5 more speed boosting tips!


[…] week I’ll explore additional tools to make your workflow more consistent, efficient, and customized to your […]
Great article. Can you follow up with proper export settings (resolutions) for specific media? I.e. iPads, iPhone, Instagram, Facebook, posters, MacBook, etc? What does output sharpening do vs Sharpening.