The post Discover ON1 Photo RAW 2024–Amazing Photo Editing Software appeared first on Lightroom Killer Tips.
]]>
Organizing Your Photos
Organization is critical to a smooth and efficient photo editing workflow. With ON1 Photo RAW 2024, it’s incredibly easy to browse folders, use the filmstrip view, and even leverage star ratings to keep your photo library organized—no more hunting for that perfect shot. The new and powerful search capability will also quickly get you to the photos you need.

Editing Basics
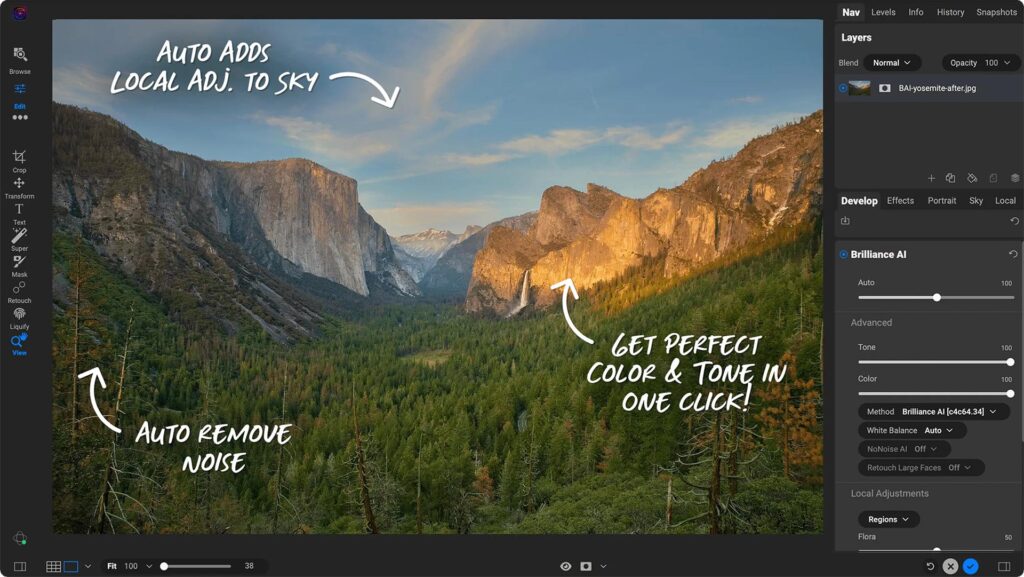
The true power of Photo RAW lies in its editing capabilities. In the video, I guide you through the fundamental tabs in the Edit module, starting with Develop and moving on to Local Adjustments, Effects, Sky, and Portrait. You will get a great idea of what the app can do as I cover the basics first and then dive into advanced techniques to take your editing skills to the next level.
Advanced Editing Techniques
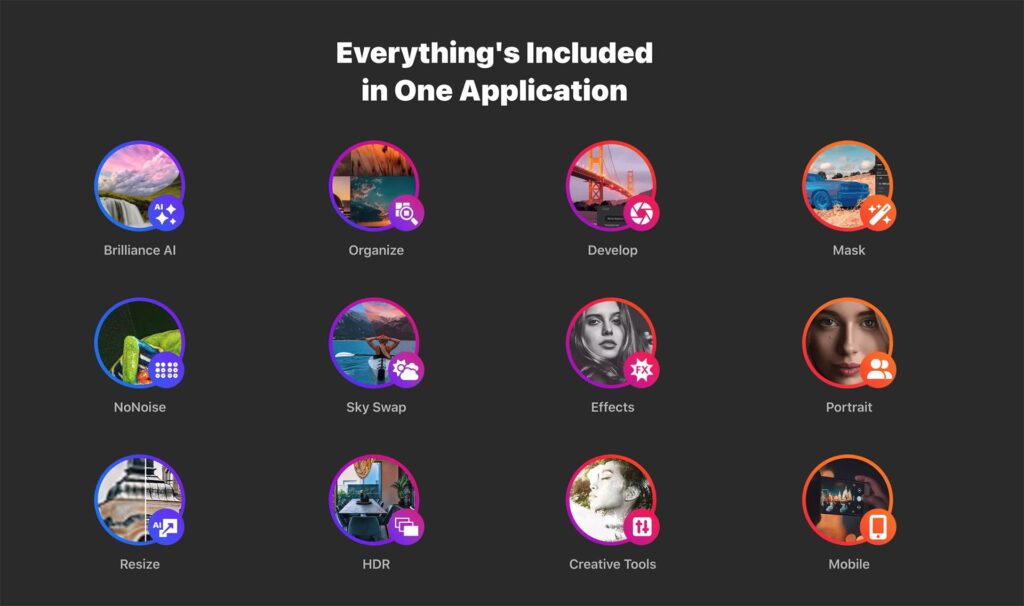
Some of the more advanced editing techniques are also included in Photo RAW. I suggest looking at the magic of the all-new Brilliance AI for automatic adjustments. From cropping to healing brush usage and targeted adjustments with Super Select AI, you’ll see how Photo RAW makes it ultra simple to enhance specific elements in your photos like never before.
Presets and Filters
Photo RAW 2024 comes packed with presets and filters to add that extra flair to your images so you can style them to your specific tastes. You can quickly apply presets, create your own, and use filters to achieve stunning effects. Whether you are a beginner or an experienced photographer, these tools will become your creative sidekicks.
Portrait Retouching
I also demonstrate how Photo RAW makes portrait retouching a breeze with AI-powered features, from smoothing skin to enhancing facial features and even replacing backgrounds. It’s one of the easiest tools for all your retouching needs.
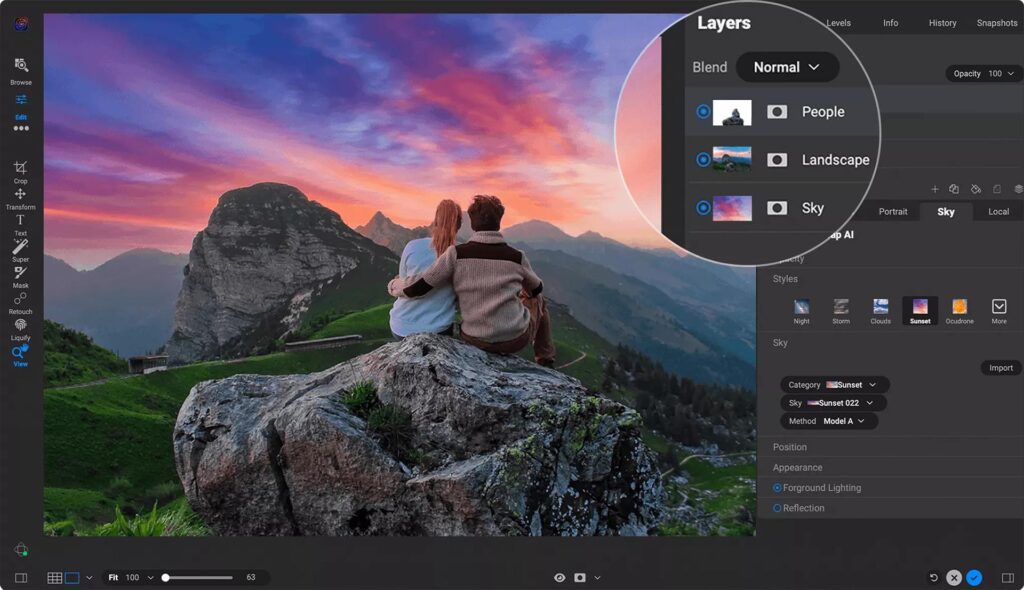
Advanced Features: Layers and Resize AI
ON1 Photo RAW also has a layered workflow. Think of it as having Lightroom and Photoshop combined but for photographers. This empowers you to tackle tasks typically associated with advanced editing software like Photoshop. Plus, we’ll explore the Resize AI module, ensuring your photos maintain top-notch quality even when upscaled.
The Complete Ecosystem
But wait, there’s more! Photo RAW isn’t just a desktop application – it’s part of a complete ecosystem. The mobile app for iOS and Android and our cloud syncing service allow you to seamlessly work across all your devices and access your edited photos.
Learning Resources and Support
ON1 Photo RAW 2024 comes with a healthy amount of resources so you get the most out of your purchase. There is a detailed user guide, free video tutorials, or our exclusive education community–ON1 Plus, and you’ll find everything you need to master Photo RAW.
Conclusion
As you embark on your photography adventures, I am grateful for you considering ON1. I can’t wait to see the incredible creations you’ll achieve with this powerful photo editing tool. Whether a hobbyist or a pro, ON1 Photo RAW has the tools and support to take your photography to new heights. Let’s capture those moments and create something extraordinary together!
Get your free 30-day trial of ON1 Photo RAW 2024!
The post Discover ON1 Photo RAW 2024–Amazing Photo Editing Software appeared first on Lightroom Killer Tips.
]]>The post Upgrade Your Editing Game with GenSwap in Luminar Neo appeared first on Lightroom Killer Tips.
]]>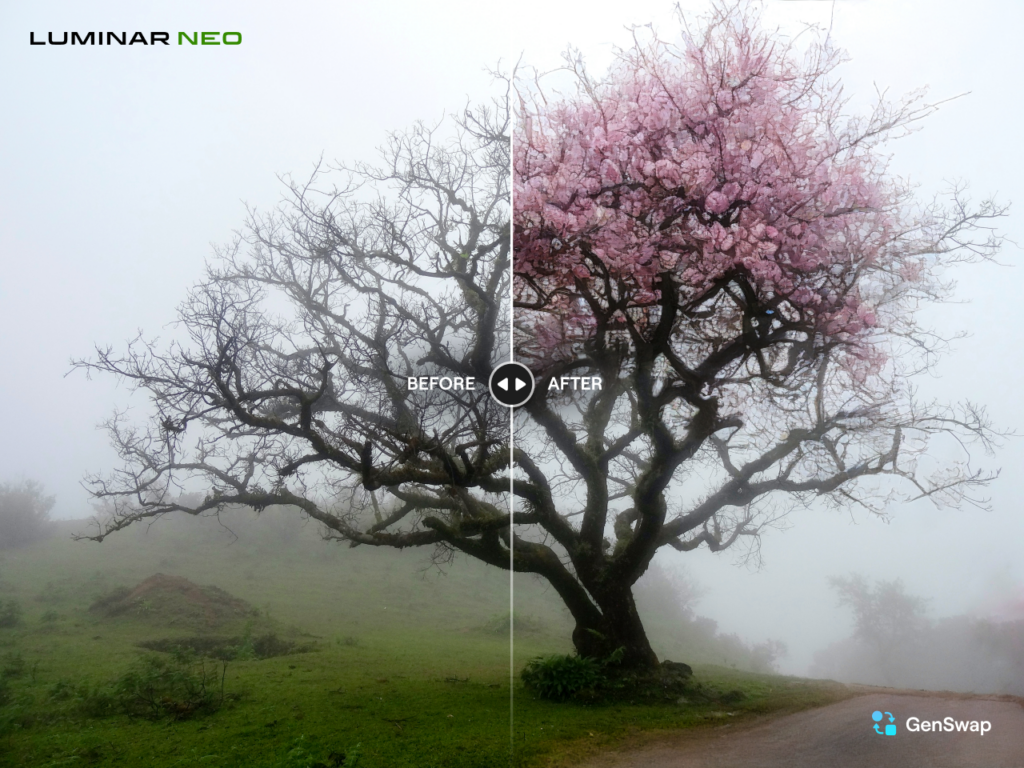
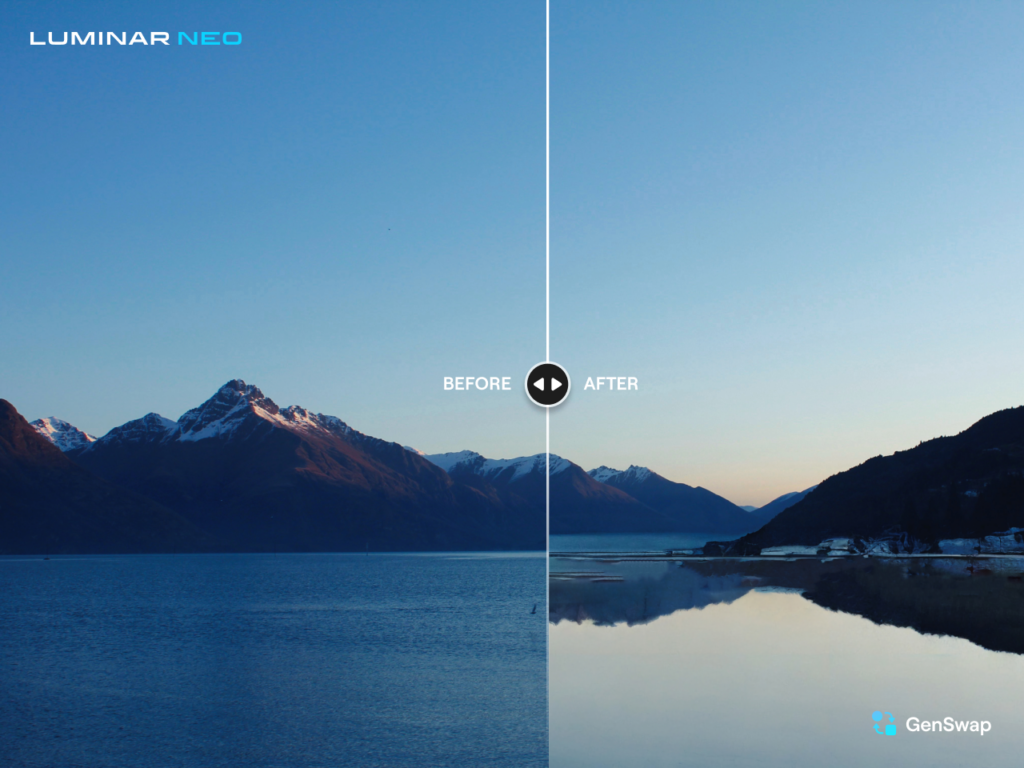
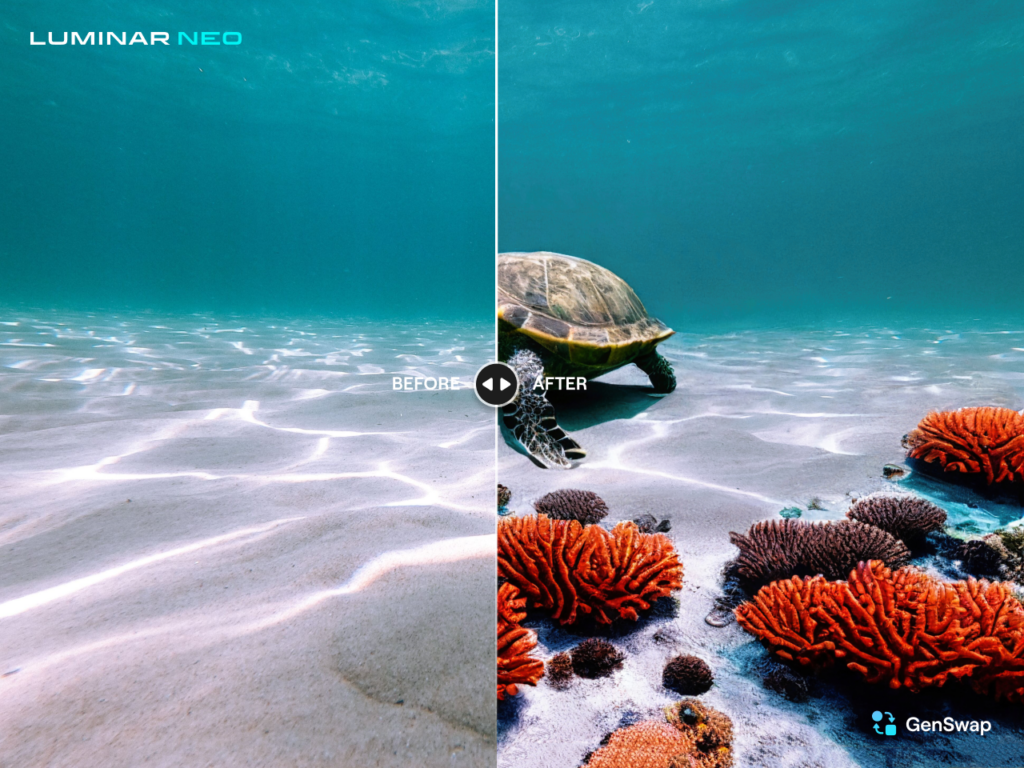
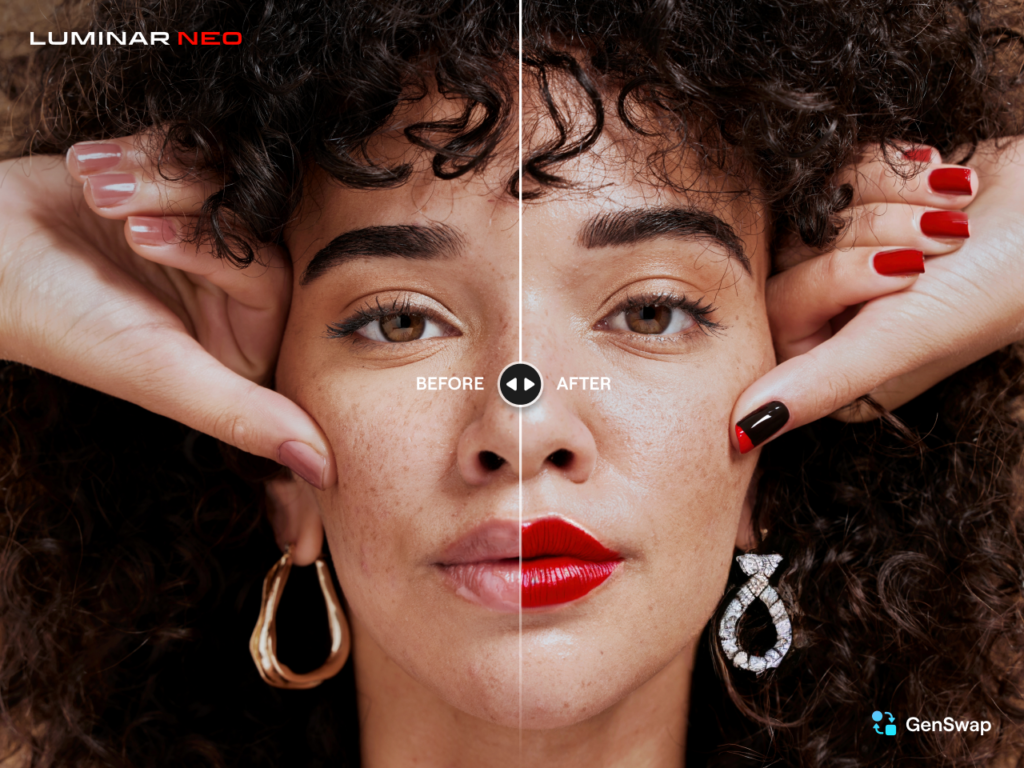
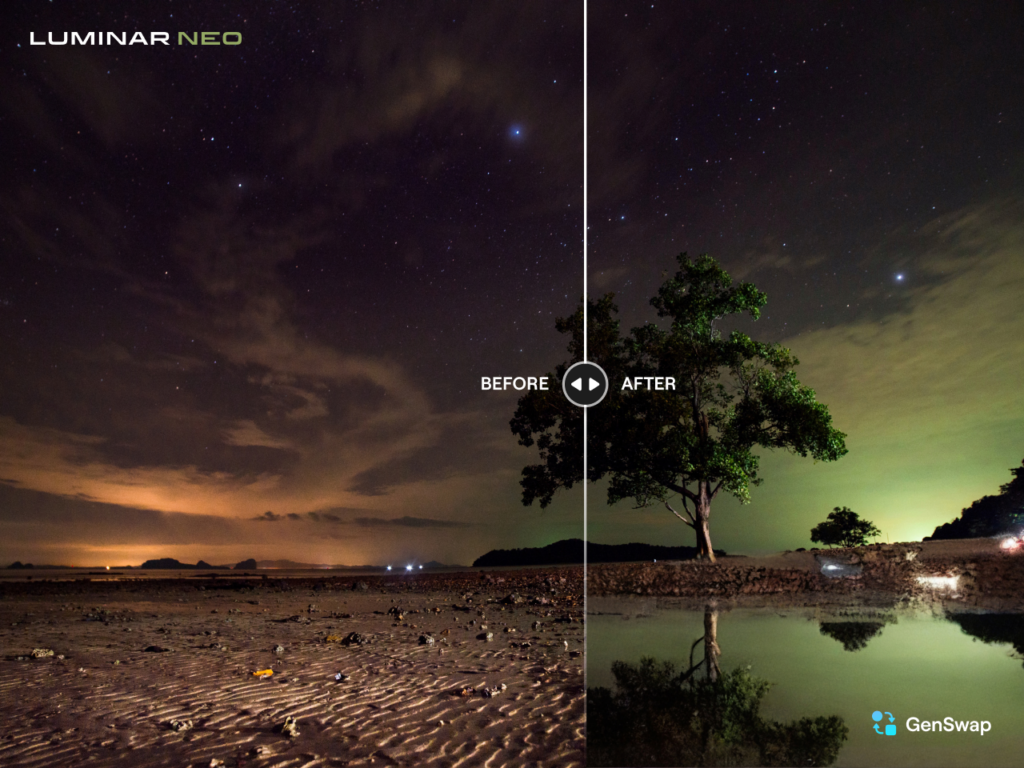
At its core, Luminar Neo is about pushing the boundaries of photo editing by creating intuitive, powerful and easy-to-use tools that are accessible to photographers of all skill levels. With the goal of rewriting the rules and inspiring users to transcend the ordinary, Luminar Neo offers photographers the ability to leverage the power of next-gen AI-powered photo editing software. One of Luminar Neo’s newest groundbreaking features is GenSwap, a generative AI tool that redefines editing possibilities.
What is GenSwap?
GenSwap is a game changer that allows photographers to swap, alter and replace specific elements within photos. Using intelligent technologies, GenSwap analyzes photos and integrates AI-generated visuals that seamlessly fit in with the rest of your picture.
Here are a few ways to explore its capabilities:
Color Customization: Effortlessly adjust and alter colors with just a few clicks. By providing a prompt to GenSwap, photographers can change the color palette of an entire photograph. From vibrant reds to serene blues or eclectic patterns, color enhancements can elevate visual appeal without compromising the photo’s integrity.
Landscape Refinement: Transform a murky lake into pristine, crystalline water to make aquatic scenes appear more vivid and inviting. A simple change can affect the overall ambiance of the shot, intensifying its impact.
Picturesque Details: Adding a bee to a flower or enhancing other foreground elements can significantly amplify the visual narrative. GenSwap seamlessly integrates these details, making the photo more dynamic and immersive.

Background and Foreground Alterations: Beyond specific components, GenSwap allows for nuanced adjustments to both foreground and background elements. Whether it’s enhancing lighting, adjusting perspectives or refining textures, photographers have the flexibility to fine-tune every aspect of their composition.
With the simple input of a prompt, you can make precise modifications to photos while maintaining a natural and cohesive visual narrative.
You can even get imaginative with GenSwap by blending reality with the fantastical. By integrating mythical elements into everyday scenes, you can infuse dreamlike qualities into your photos to give them a unique storytelling angle.
GenSwap’s intuitive algorithms understand the intricacies of your images. They can help you effortlessly refine the composition of your landscape shots or remove imperfections from portraits to enhance details, colors and textures.
With GenSwap, the possibilities are endless. Experience a new level of creative freedom without the restrictions of conventional editing techniques.
Cyber Week Offers:
This Cyber Week, discover the full capabilities of GenSwap by taking advantage of irresistible deals on Luminar Neo subscriptions:
- Get 84% OFF a 12-Month Pro Subscription + Creative Assets Collection
- Get 82% OFF a 24-Month Pro Subscription + Creative Assets Collection
- Get 85% OFF a Lifetime Licence with Extensions + Creative Assets Collection
Step into the future of photo editing this Cyber Week and harness the transformative power of GenSwap. Secure these exclusive deals today before they vanish!
The post Upgrade Your Editing Game with GenSwap in Luminar Neo appeared first on Lightroom Killer Tips.
]]>The post Next Week: the Lightroom Conference is here! appeared first on Lightroom Killer Tips.
]]>
We would love to have you with us for the conference (and the pre-conference session the day before). Here’s the link to grab your ticket today at the early-bird discount price. Hope you can make it. 
Have a great weekend, everybody, and we’ll catch you next week at the conference. 🙂
-Scott
The post Next Week: the Lightroom Conference is here! appeared first on Lightroom Killer Tips.
]]>The post The Lightroom Community Has Lost A Legend. Martin Evening (1959-2022) appeared first on Lightroom Killer Tips.
]]>
My heart sank when I heard the news that Martin Evening, one of the legends of our industry, one of its most talented and prolific authors, a gifted instructor, an award-winning photographer, and one of our reader’s favorite columnists in Photoshop User magazine, had passed away after a long, courageous battle with cancer. He was only 63, passing far too soon, but the impact his life and career had on the worldwide Photoshop and Lightroom community will be felt for many years.
You can see Martin’s fingerprints on Lightroom every time you export a file or go to print in Lightroom Classic’s Print module and choose that all-important last step of applying Output Sharpening. That sharpening came from a technology developed by a software company co-founded by Martin called Pixel Genius. He was their product manager for their PhotoKit Color plug-in, lead creator, and a key part of this award-winning company, founded by a close-knit group of friends and industry icons. But it wasn’t just this development side of Martin that benefited the Lightroom community; it was also through his many bestselling books, his lectures around the world, and his articles in Photoshop User, where he helped users to learn and embrace new ways of editing their images. I’ve always admired Martin’s deep knowledge of Lightroom (far beyond my own) and his remarkable ability to communicate advanced topics in a way that made them understandable and accessible.
When asked about his success and many accomplishments as an author, he said, “When I reflect back as to why my books sold so well, I don’t think it was because I was particularly smart. Sure, I was clever enough to write informatively, but this never came as easy to me as it did for others. I think the fact I nearly always found it a struggle to make sense of complicated concepts, and seek ways to explain them more clearly, was something that resonated with my readers and made my books successful.”
His engaging style gained Martin legions of fans around the world, and we were tickled pink when he agreed to write a monthly column in our magazine. Of course, he was an instant hit with our readers, who loved his insights, teaching style, and his ability to engage and inspire in every issue.
I remember the first time I met Martin, 20-something years ago, at an Adobe event in Stockholm, Sweden, where we were both speakers. I had just arrived at the conference after a long flight. I was a bit jet-lagged and had to go straight to the stage and set up the AV (back then, doing presentations from a laptop and having the AV actually work was pretty sketchy). Sure enough, for whatever reason, the AV team couldn’t get my laptop to see the projector, and things looked bleak (and I was the day’s first presenter).
While the AV team was scrambling to get my laptop to see the projector, I was introduced to the folks from Adobe and some of the other instructors, and that’s where I met Martin for the first time. He could tell I was freaking out a bit and asked if everything was okay. I told him about my laptop/projector issue, and he said, “Well, you’re welcome to use my laptop. They just checked it, and it connected to the projector, no problem.”
I thought, “Wow, I just met this guy 60 seconds ago, and he’s offering me his equipment to use.” I thanked him, but I said I wasn’t sure that would work because I use a mouse with my laptop (stop snickering, this was a long time ago), and he said he thought he might have one in his bag somewhere and he’d go dig it up and connect it for me (and that’s precisely what he did). I was really struck by how gracious and kind he was, especially to someone he had just met. Well, sure enough, they couldn’t get my laptop working, and I went on stage using Martin’s laptop (and mouse), and it worked out great. But then something unexpected happened unrelated to my laptop issue.
My session was called “Photoshop Down & Dirty Tricks,” and I was teaching how to do a whole bunch of different Photoshop special effects based on current trends in print, TV, and Web advertising. Stuff like, “See this magazine ad for Nike? Well, here’s how they did that cool-looking glow and the reflection under the sneaker.” The same type of stuff we do in Photoshop User magazine today in our “Down & Dirty Tricks” column. Well, I did my session, and it was a huge hit with the crowd. Lots of oohs and aahs and spontaneous applause throughout, and it just went over like gang-busters. They introduced the next speaker immediately after I wrapped up: a British photographer and Photoshop trainer. We shook hands as we crossed on the stage. Seemed like a nice guy. Turns out, he wasn’t.
He got to the podium and addressed the audience, “I just sat through that session with Mr. Kelby, and before we get started, I need you to know that everything he showed you, everything you just learned, was absolute crap. It’s useless drivel and all that special effects stuff that ‘wows’ the client isn’t the stuff that will make you money. I’m going to show you something that actually will.” I’m paraphrasing what he said (it was 20+ years ago), but it was way more than just those few sentences and way more brutal and condescending. He literally went on and on for five minutes or so about how stupid special effects are, how dumb we all are for liking them, and how senseless it was for me even to be teaching them.
My only saving grace was that the audience wasn’t at all receptive to his attack. I think he was expecting cheers, but it was more of a collective stunned silence. Everyone was pretty shocked (including the folks who hired me at Adobe). After his onslaught, he went on to spend the rest of his presentation showing slides on how to properly light a product shot for a catalog and how to make the background pure white while keeping the shadows intact under your product shot, using some Photoshop techniques. He kept returning to the point: “This is the stuff that actually makes you money!” You can’t make this stuff up, folks.
Anyway, so what does that guy’s rant about me have to do with Martin? Well, about a year later, I got an email from Martin letting me know he was asked to help put together a large Photoshop and photography event in the U.K., and he was in charge of hiring the instructors. The organizers of the event wanted to use all U.K.-based instructors, and they had sent Martin a list of possible candidates. Martin was asking if I remembered the guy’s name who attacked me in Stockholm. He wanted to make absolutely sure that he didn’t hire that guy because of what he had done to me back at that event. The fact that Martin cared enough to reach out about it a year later and that he even remembered it in the first place just cemented to me what an awesome person he truly was.
The next time I saw Martin in person was right before he went on stage to accept his award at his induction ceremony for the Photoshop Hall of Fame during the opening keynote for the Photoshop World Conference back in 2008. We were lucky enough to have him speak at the conference (he rocked it), and we’ve been blessed to have him sharing his knowledge and his gift for teaching in Photoshop User magazine since November of 2016.
There’s a lot more to Martin, his life, and his career, and I invite you to take a few moments and watch this presentation from him, recorded back in May 2021, for the Art of Photography Conference. It’s titled, The Hits and Misses of a Creative Career. It’s a wonderful retrospective: You’ll see some beautiful photos, hear some fascinating stories, see how his work transitioned over his lifetime, and get to know a little more about the man behind the lens, the books, and the amazing images. You can find it by clicking here.
I’d like to leave you with one final quote from Martin: “Above all else, the most important aspect of my life was my devoted marriage to my wife Camilla and being around to see our daughter, Angelica, grow up to become a young woman. I have no regrets about cancer. I have lived a fulfilled life professionally as well as a full, active involvement with personal family life, which meant so much to me and the most important thing in my life.”
Martin’s legacy of sharing and giving so much of himself, personally and professionally, is one to be proud of. A life lived well. He will be missed.
—Scott
The post The Lightroom Community Has Lost A Legend. Martin Evening (1959-2022) appeared first on Lightroom Killer Tips.
]]>The post Image Connect—A Photographer Matching Service appeared first on Lightroom Killer Tips.
]]>Sponsored
Do you have a passion for photography but struggle to find gigs? Image Connect is a photographer matching service offered by Canon U.S.A., Inc. that helps people and businesses find and book a photographer for any need or occasion.
Building on a tradition dating back to 1937, Canon is trusted by customers for its legacy of expertise, quality, and reliability. This new, easy-to-use platform will help photographers, regardless of what camera gear they use, to find potential clients and book gigs. With the power of the Canon brand behind you, Canon can market the Image Connect platform and help potential clients find you and help you continue to grow your business.
Apply to join Image Connect now through 8/31/20 and complete 5 gigs by 12/31/20 and receive a $250 bonus.*
The first step to join Image Connect is to submit an application at:
https://imageconnect.usa.canon.com/join. All photographers are welcome and encouraged to apply to join. Image Connect carefully reviews the credentials of every photographer, with these two components in mind; your professionalism with customers and the quality of your work.
Our goal at Image Connect is to match customers with the best photographers—regardless of what equipment you use. Our most successful applications come from photographers who have full or part-time professional experience in the industry over several years, own their own professional gear and are experienced with photo editing software.
As a photographer on Image Connect you will be responsible for interacting with the customer, such as setting the date and your rate and delivering outstanding photos. While Canon keeps it simple by handling tasks like: facilitating contract negotiations, creating invoices, processing payments, collecting and remitting tax and supporting the digital delivery of photos.
Image Connect wants you, as the photographer, to pursue your passion, find gigs and get paid! Image Connect is rapidly growing and looking to recruit photographers nationwide.
If you are looking to expand your photography career, please visit us at,
https://imageconnect.usa.canon.com/join to learn more and apply today!
*To qualify for this offer:
–You must apply to be a photographer on Image Connect and complete your application by 8/31/2020.
–Currently, Image Connect is available in the US Only and limited to the following markets: Arizona, California, Colorado, Connecticut, Florida, Georgia, Illinois, Maryland, Massachusetts, Michigan, Nevada, New Jersey, New York, North Carolina, Ohio, Pennsylvania, Tennessee, Texas, Virginia, Washington, Washington D.C. More states may be added during the term of this offer; please check the website for further details.
–You must select “KelbyOne” as your referral source on your application.
–You must complete at least five (5) photo shoots during the offer period of July 28, 2020, 12:00 A.M. ET until December 31, 2020, 11:59 P.M. ET. “Completed” means the customer has accepted the photos and photographer has received payment.
–You must be approved by Canon to join Image Connect by successfully passing a background check and portfolio review.
–After the completion of five (5) photo shoots, Canon will initiate payment within ten (10) business days through the Image Connect payment portal.
The post Image Connect—A Photographer Matching Service appeared first on Lightroom Killer Tips.
]]>The post Tomorrow Our Two-Day Live Online Lightroom Conference Kicks Off appeared first on Lightroom Killer Tips.
]]>Hundreds and hundreds of photographers around the world have already signed up to be a part of this ground-breaking online event, and if you want to join in, it’s not too late. Head over to lightroomconference.com right now and grab your ticket (don’t wait until tomorrow and wind up paying full price — get your ticket at a big discount today).
If somehow you’re just hearing about this, check out the video below:
We’re bringing the Lightroom superstars together to make this the Lightroom training event of the year, and we’d love for you join us for this remarkable training experience.

…and it all starts tomorrow:
May 5-6, 2020
11:00 AM – 5:45 PM (EDT)
This live-streamed event is open to everyone, and you can register today at lightroomconference.com – Thanks to everybody who has helped us spread for the word, and if you have a photographer friend who you know this would be perfect for, we’d love it if you’d share this post with them.
We’re super psyched, and hope you are, too. In the meantime, stay healthy, keep washing those hands, get a good night’s sleep and I hope to see you online with us tomorrow at the conference.
Cheers,
-Scott
The post Tomorrow Our Two-Day Live Online Lightroom Conference Kicks Off appeared first on Lightroom Killer Tips.
]]>The post Platypod: Knocking it Out of the Park with Platyball appeared first on Lightroom Killer Tips.
]]>Sponsored

Just recently, I had the opportunity to test drive a new ball head, the Platyball. Not available for direct sale until later in the year, it was a preproduction version designed and manufactured by the makers of the popular Platypod Max and Ultra.
The Platyball will come in two models, the Elite and the Ergo. Both units have identical mechanical features. However, the Elite has an incredibly accurate LED-based leveling device that makes it stand out from all the other ball heads on the market.
I loved working with this ball head. The Platyball not only has a unique design, it is visually striking. Its sleek ergonomic design reminds me of a Ferrari. Even the rich color and finish look terrific. And the design itself makes it an upside-down marvel.
The Platyball is the very best ball head I’ve ever used. You can understand why when you read the specs:
- Forged aluminum chassis with a beautiful metallic finish, built to last.

- The ball, 35 mm in diameter, is rated to hold 22lb. (10 kg.) off-axis load.
- The system is completely knob-less.
- The head is positioned using progressive variable tension locking and unlocking buttons.
- The built-in panning system is comprised of a panning turntable and locking wheel with etched 360° markings and indicator arrows.

- The quick-release clamp is Arca-Swiss compatible and has a twist-locking collar and safety button for added security.
- The tripod socket is a standard 3/8” socket – stainless steel reinforced and adaptable to 1/4” with included reducer bushing.
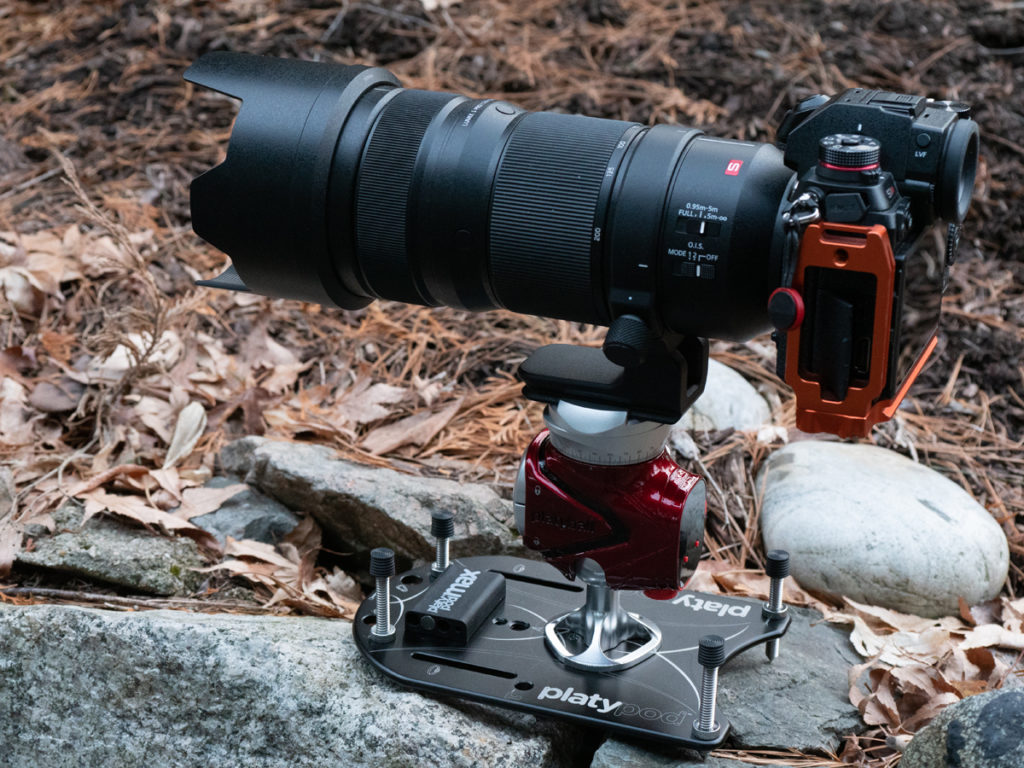
- The base is triangular shaped, rounded, and slotted for transport on a carabiner or strap (not included).
- The Elite includes a calibration disk with a bubble level, and a 1/4” stud that can be used to mount small cameras and smartphone mounts.
- The Elite weighs 1 lb 6 oz, and the Ergo is 1 oz lighter.
- A protective jacket is included, making it even easier to pack and transport.
- The Elite is equipped with a bidirectional electronic level. A master power switch turns on the power. Two buttons on the face, one to activate the leveling system and the other is multifunctional for brightness, calibration and factory reset. A single A23 Alkaline battery powers the module.
What I look for in a ball head is reliability, functionality, and ease of use. I hate fiddly ball heads. The Platyball Elite and Ergo meet and exceed these requirements in every category.
When you hold this ball head, you immediately realize it means business. It’s solid, yet sleek and you sense the precision.
Use Scenario
Attaching the Platyball to a tripod is a breeze. Since the base has three fins, it provides a grip that is easy to hold and tighten.
Next, it’s all about mounting the camera. Simply rotate the clamp’s elliptical collar twist collar to open the jaws, insert the plate and turn the collar to get a solid grip. I tested it further by twisting the plate that was attached to a lens foot; there was virtually no give at all. Best of all, there are no levers or knobs that can be accidentally released or twisted off.
The contours of the Platyball fit comfortably in your hand. The two tension and release buttons align perfectly with your fingers. Applying a light tension keeps the camera and lens in place while allowing for smooth positioning. Once you have the desired framing, you can increase the locking tension with a few pushes on the top button.
Reframing is equally quick. A few pushes on the lower release button releases the tension on the ball, allowing for smooth repositioning. The head is so well designed that for cameras with a short zoom or smaller lens, you can adjust the position with just one hand.
Panning
For panoramas, typical ball heads need to be leveled either by adjusting the tripod legs or by mounting a leveling system. Since the Platyball is an inverted system, all you need to do is to level the head, and the panning table will remain perfectly level. The table is etched with major graduations every 5 degrees and minor ones for each degree. A locking wheel releases the panning table for smooth 360-degree single row pans.
Conclusion
Platypod has always designed and produced unique products, creating a history of solutions and expanded creativity for photographers. Platyball extends that same reputation for reliability and meeting expectations. They’ve succeeded in producing an easy-to-use, solidly performing, no compromise ball-head all photographers will appreciate.
I am hooked!
The post Platypod: Knocking it Out of the Park with Platyball appeared first on Lightroom Killer Tips.
]]>The post The Reality of Switching to Capture One appeared first on Lightroom Killer Tips.
]]>
That was our topic yesterday on ‘The Grid’ my weekly video podcast for photographers, and my guests were both dear friends and icons in the community, the awesome Matt Kloskowski, and ‘Cool Frenchy Guy’ Serge Ramelli. It was a really eye-opening discussion for a lot of folks, and I’ve embedded the show below so you can check it out (you can just let it run in the background while you edit your images today).
Thanks for giving the show a listen (or a watch, or both).
Current Capture One users – before you go and post a comment…
Watch the episode. Just actually watch it before you post.
I’m off to NYC today for a day trip for some meetings, and I’m right back home tonight. It’s pretty Brrrrrrrr up there for a Florida guy like me, but I dressed pretty warm so I won’t turn into a total popsicle.
Here’s to staying warm on a Thursday!
-Scott
The post The Reality of Switching to Capture One appeared first on Lightroom Killer Tips.
]]>The post August 2019 Lightroom Classic, Lightroom, and ACR Update appeared first on Lightroom Killer Tips.
]]>GPU Accelerated Editing
The most welcome feature is likely to be the improved editing performance in Lightroom Classic and Camera Raw that comes from being able to take advantage of the GPU during editing. To enable this new feature in Lightroom Classic head to Lightroom Classic > Preferences > Performance (PC: Edit > Preferences > Performance), and note the new options in the Camera Raw section. By default, Use Graphics Processor will be set to Auto (assuming your GPU is supported). Click that drop-down menu and choose Custom to access the new option.

When set to Custom, you will see a checkbox for Use GPU for display. This is the same GPU utilization that exists in the prior version of Lightroom Classic and Camera Raw. Below that an additional option for Use GPU for image processing will appear. When checked, the GPU will also be used when making adjustments in the Develop module, which should result in more robust performance. Those of you with larger resolution monitors and machines with more powerful GPUs are most likely to notice the improvement. Check out Adobe’s GPU Troubleshooting and FAQ document to learn more.
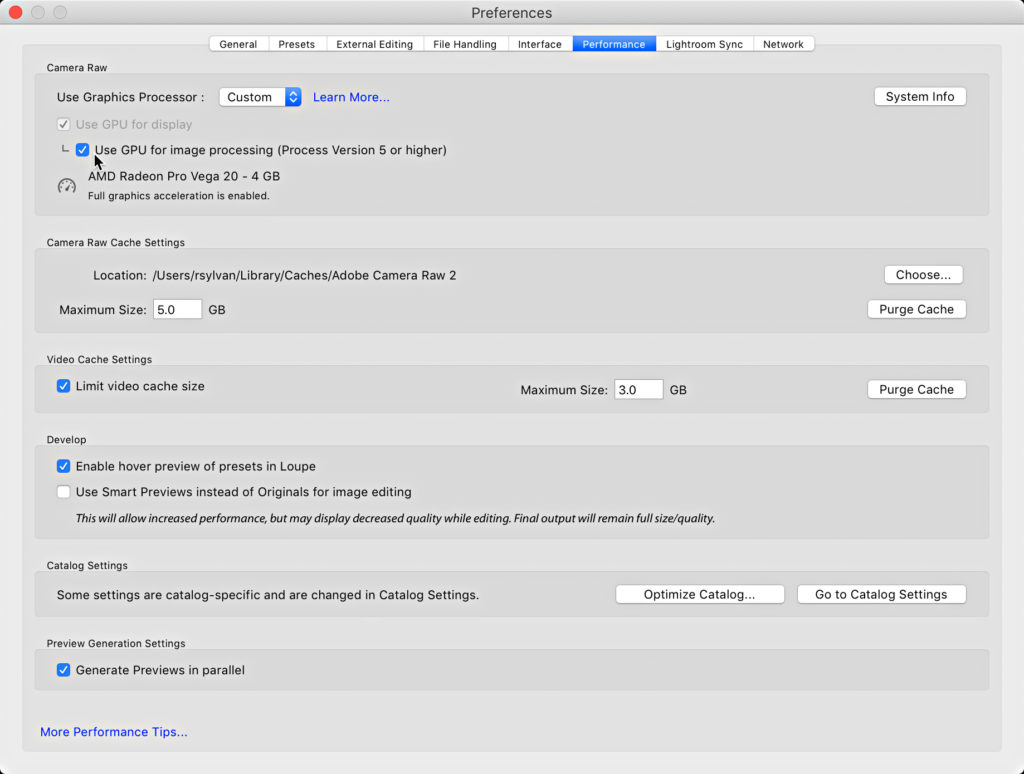
To enable in the Camera Raw plug-in, go to Photoshop > Preferences > Performance (PC: Edit > Preferences > Performance), and you will see the same options as outlined above.
PNG Export
Ever since Lightroom Classic supported the importing of PNG files people have been asking for the ability to export as PNG too. Well, that day has finally arrived. On the Export dialog, in the File Settings panel, you can now select PNG from the Image Format drop-down menu. If you start by selecting a file with transparent areas (such as a TIF, PSD, or PNG), then that transparency will be maintained in the exported PNG copy as well (transparency is always on).
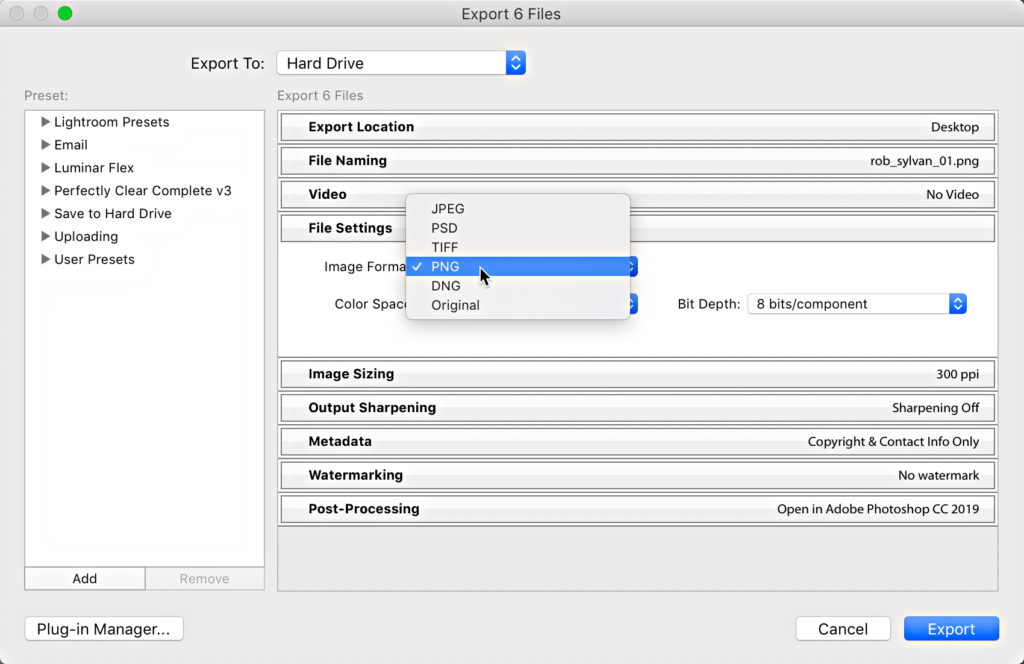
You can also save out PNG from Camera Raw via the Save Image button at the bottom of the ACR interface.
Library Module Tweaks and New Features
There are a few new things in Lightroom Classic’s Library module. For one, Browsing folders in the Folders panel should now be faster. I’ve definitely noticed a speed improvement on launch as the Folders panel displays.
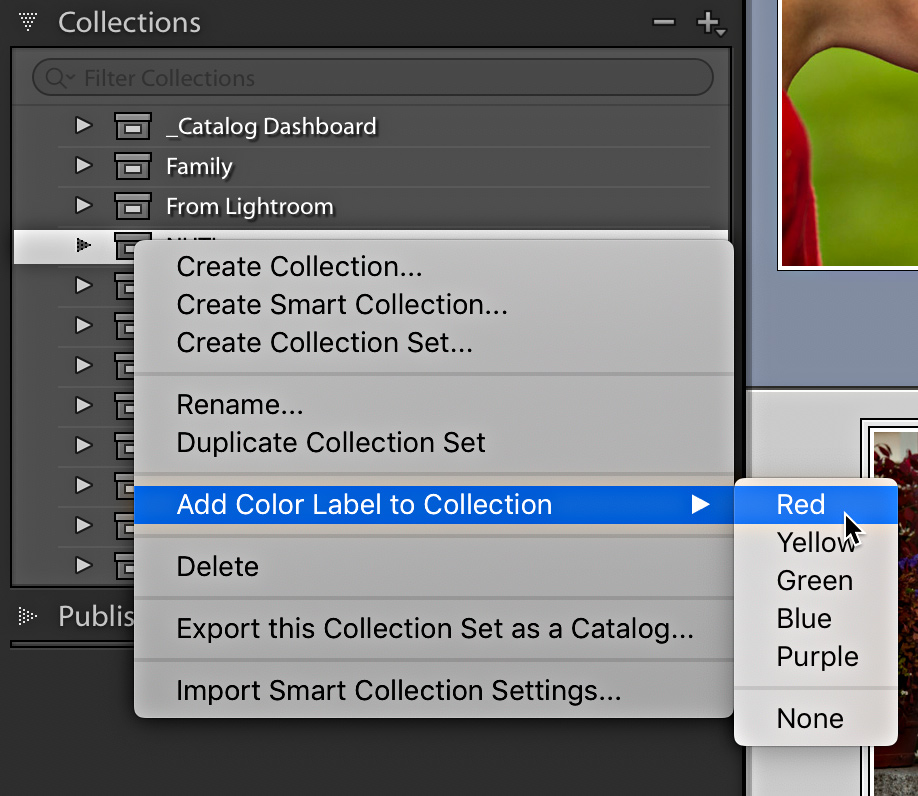
Down in the Collections panel, we now have the ability to apply a color label to collection sets, collections, and smart collections the way we do for folders in the Folders panel. Simply ctrl-click (PC: right-click) on a collection, smart collection, or collection set, and choose the color from the Add Color Label to Collection menu. Set the color to None to remove the color.
The Collection panel filter (right at the top) also has the ability to filter the contents of the panel on Labelled Collections.
You might also notice that index number now appears on thumbnails in the Filmstrip. I’ve always disabled those on thumbnails in Grid view, but if you are fan, then this one’s for you. You can disable the display of the Index number in the Filmstrip by going to Preferences > Interface, and unchecking Show Index Number in the Filmstrip section.

Batch Merge to HDR and Pano in Lightroom Classic
This time saving feature adds a super power to stacks of photos taken with the intent of merging into a pano or HDR. Start by selecting all of the photos for the merge, then group them into a stack. Proceed by creating a stack for each group of photos you intend to merge together. You can then select all of the stacks and use the Photo > Photo Merge menu to select the desired type of merge (note, all stacks must be for the same type of photo merge).
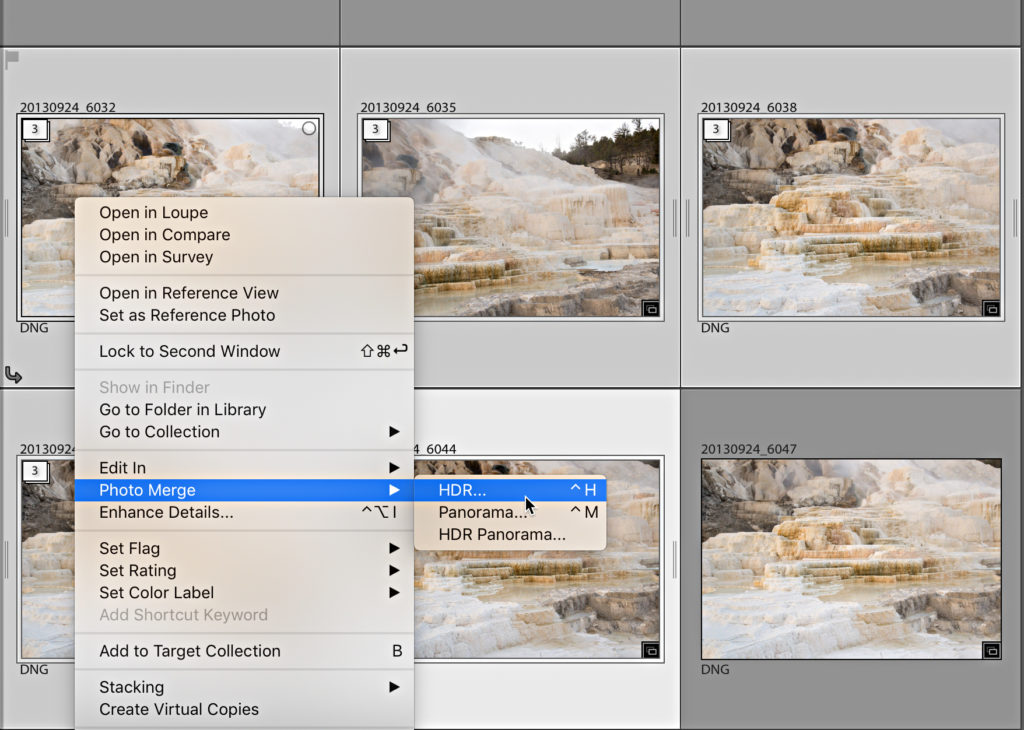
For example, let’s say you had a folder containing five stacks of bracketed shots waiting to be merged to HDR. You can now select all five of the stacks and use the Photo > Photo Merge > HDR menu to batch the process of creating a single HDR from each image stack. The settings from the previous merge operation will be used, so you may want to run a single merge first to ensure the settings are as desired.
Note, the same merge operation is performed on each stack, so don’t include HDR and pano stacks in the same batch. Non-stacked images should be ignored if stacks are included in the initial selection.
Moving on to the cloud-based Lightroom …
Recover Deleted Files
Building on the feature released to Lightroom Web back in May, the Recover Deleted Files option has been added to the Lightroom apps for Mac, Windows, iOS, Android, and ChromeOS.
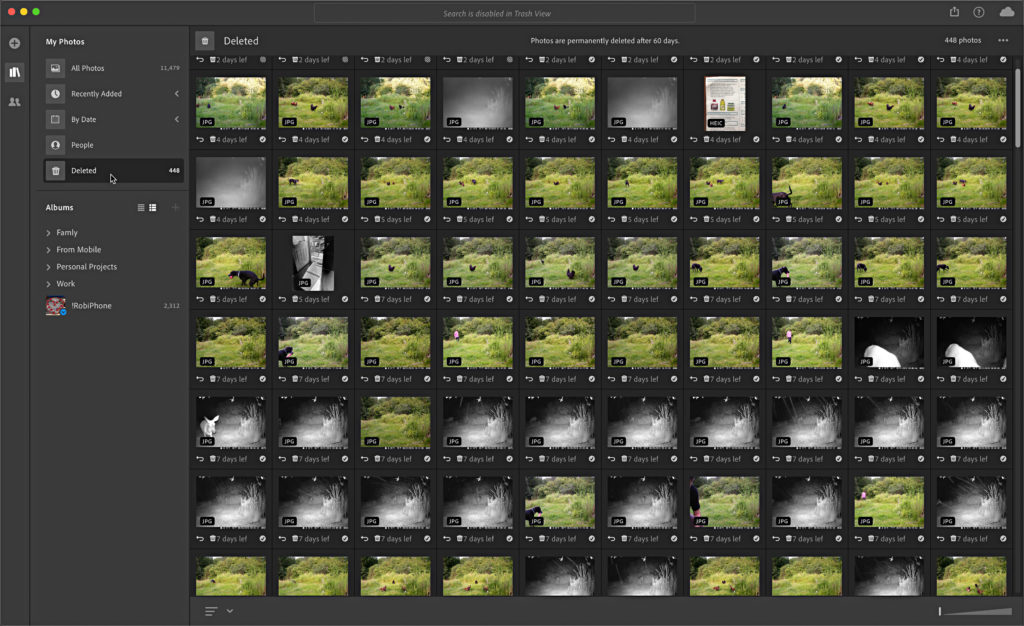
Look for the Deleted icon, where you will find all photos that have been deleted from the cloud in the last 60 days. You have that much time to recover them if needed.
In Lightroom for iOS, Android, and ChromeOS we were introduced to Discover posts on the Home screen of the app. Discover posts allow you to see the edits that were applied to the featured photo and even watch the process happen step-by-step. In the August update you can now tap the three-dot menu and choose Download as Preset to add the settings used on that photo as a preset you can apply to your own photos (these presets are added to the User Presets folder with the name of the Discover post).

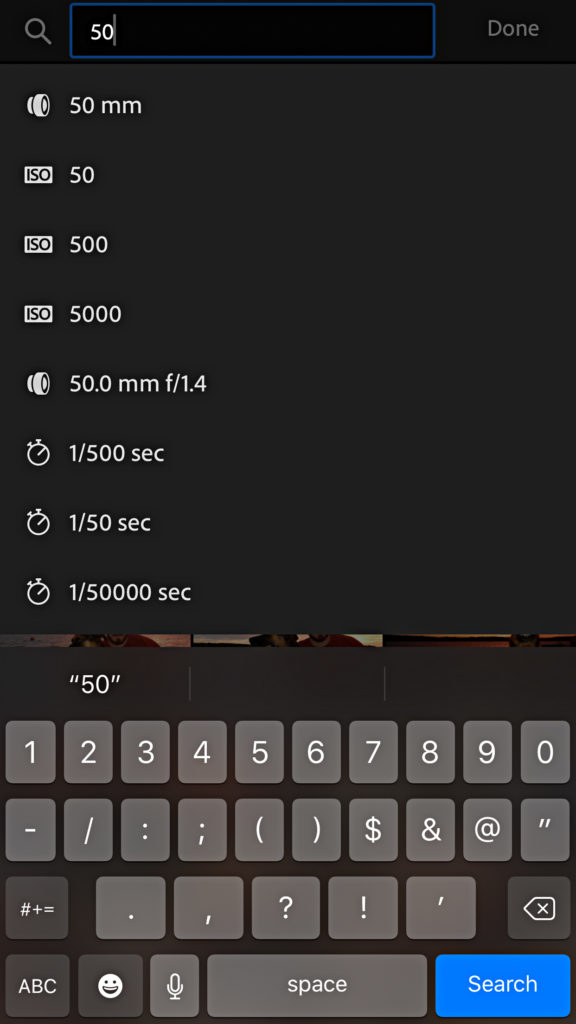
The search has also been improved in Lightroom for iOS, Android, and ChromeOS to bring it in line with the search improvements that had been added to Lightroom for Windows/Mac previously. You can now search for raw, Pano, and HDR photos, as well as photos that include a depth map, or by focal length. Just start typing and the auto complete will reveal available options that match the text you’ve entered.
Lightroom for Android and ChromeOS now have the ability to apply and edit metadata as a batch (coming soon to iOS). Just select a range of photos and you can change star rating, flag state, copyright, title, and caption to all selected photos at once.
Adobe has also published its list of support for new cameras and lenses. A summary of all new features is also available.
The post August 2019 Lightroom Classic, Lightroom, and ACR Update appeared first on Lightroom Killer Tips.
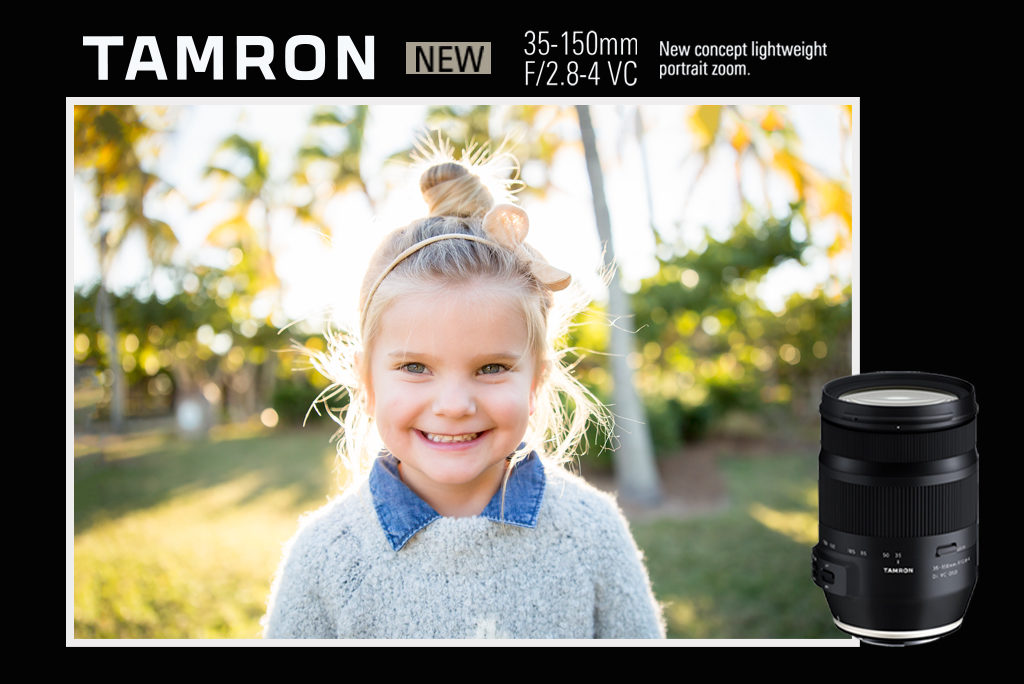
]]>The post Celebrate the Birth of the Portrait Zoom: The New TAMRON 35-150mm F/2.8-4 Di VC OSD (model A043) appeared first on Lightroom Killer Tips.
]]>For the first time ever, a dedicated portrait lens that allows you to zoom through various composition options as the creative alternatives zoom through your head. The versatile 35-150mm zoom range incorporates the 85mm focal length (optimum for portrait shooting) and covers everything from full-body shots that include the surrounding area to sharp head-and-shoulders shots. With this single lens you can make the most of every moment you spend with any subject. Combined with potent VC (Vibration Compensation), fast F/2.8 aperture (F/4 at 150mm end) and compact design, this is the only zoom you’ll ever need for portraits, street, landscapes, travel, family snapshots and across a wide range of photography subjects. It’s also the ideal “normal zoom” for your first full-frame DSLR body.
High resolution plus luscious bokeh
Beautiful balance between subject sharpness and background bokeh. Tamron’s new zoom contains three LD (Low Dispersion) and three aspherical lens elements to quash optical aberrations, a circular aperture and legendary BBAR Coating to suppress ghosting and flare—even in backlit situations. The contrast between in-focus areas rendered accurately down to the fine details and backgrounds that gently blend into the scene produces a single high-quality image. The optical performance meets and exceeds the demands of today’s high resolution 50+ megapixel DSLRs. Your portraits will positively pop!
Enhanced AF operation and VC
For fast and steady operation, this fast-handling zoom incorporates Tamron’s Dual MPU (Micro-Processing Unit) system that consists of a dedicated AF lens control MPU and dedicated vibration compensation MPU to achieve both superior AF performance and effective vibration compensation. This ensures accurate focus even in scenes with continually moving subjects or under low-light conditions.
Pack a pair and photograph everything!
This compact zoom travels light, measuring only 4.9 in long and weighing a scant 1.7 pounds. When combined with Tamron’s versatile ultra-wide-angle 17-35mm F2.8-4 Di OSD you can cover the entire range from 17mm to 150mm, all at a maximum aperture of F/2.8 (F/4 at zoomed end). The whole bundle weighs less than 3 pounds! They’re the perfect combo when you want to travel light or when shooting with two DSLR bodies. The portability and extensive zoom range are a photographer’s dream come true and flawlessly designed for everything from landscape and street photography to architecture and portrait photography.
Click here to learn more about the new TAMRON 35-150mm F/2.8-4 Di VC OSD (model A043).
The post Celebrate the Birth of the Portrait Zoom: The New TAMRON 35-150mm F/2.8-4 Di VC OSD (model A043) appeared first on Lightroom Killer Tips.
]]>