
Q&A on Lightroom to Photoshop Color Problems

Happy Friday, everybody. I got this question from a reader earlier in the week, and I thought I’d answer it here because I’ve been asked this dozens of times. Here’s the question:
“Why my imported RAW files from Lightroom to Photoshop has a different color scheme (from what it normally looks in Lightroom)?! (i.e.: it gets warmer & more reddish). More interestingly, if I open that RAW file directly in Photoshop, there will not be any changes in colors.”
It’s most likely that your Lightroom and Photoshop Color space are not the same, so when you take an image from Lightroom (which uses the ProPhoto RGB profile by default) over to Photoshop (which is probably either set to Adobe RGB 1998 or sRGB) it shifts the colors to that color space (and neither of those two has the depth of ProPhoto RGB, so you’re definitely going to see a shift).
The reason it doesn’t look weird when you open the RAW image directly in Photoshop is — your RAW file doesn’t have a color profile applied to it yet, so it doesn’t need to convert it (and plus, you’re not comparing it to how it looked in a different program).
OK, so what’s the fix?
Simply make sure that Lightroom and Photoshop are speaking the same language when it comes to color.
When you take a RAW image over to Lightroom, it sends a copy of the file, and it assigns a profile at that time. So, which profile does it assign? You can find out what it’s assigning by looking under Lightroom’s Preferences, under the External Editing Tab.
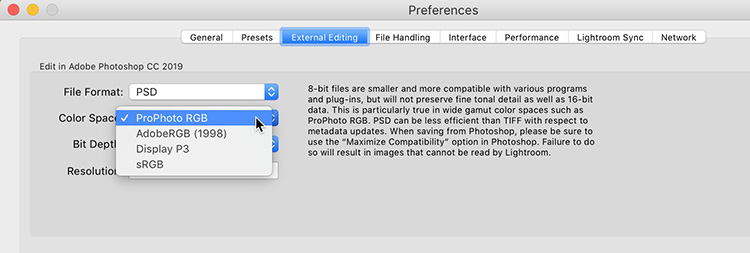
Above: Here are those external editing preferences, and you can see the default is ProPhoto RGB. That’s a really great choice if you’re going over to Photoshop and then coming back to Lightroom.
Now let’s go check your Color Space settings in Photoshop CC.
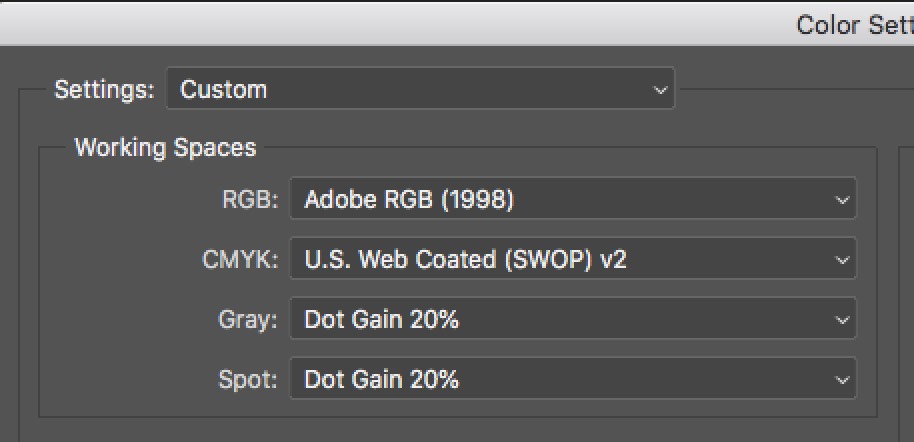
Above: Go under Photoshop’s Edit menu, choose Color Settings, and see what the RGB Working Space. Here’s it set to Adobe RGB (1998) which is a mismatch with the ProPhoto RGB file coming over from Lightroom. So, Photoshop will convert the file to Adobe RGB (1998) throwing away color outside its gamut.
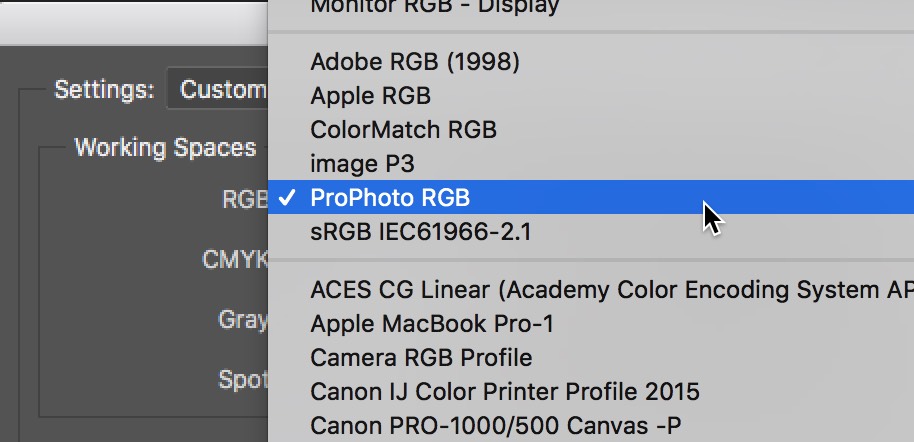
So, we just need to get these on the same space — I would recommend (if you’re bringing the file back to Lightroom, which is likely), to switch Photoshop to ProPhoto RGB (as shown here).
Hope that helps. 🙂
I’m off to Atlanta on Sunday
I’ll be up at PPA’s Imaging USA Expo (first photography trade show of the 2019 season). I’ll be doing a book signing at the Rocky Nook Booth on Sunday at 3:oo pm, so if you’re at the show, I’d love to say hi – I hope I’ll see you there. 🙂
Then I’m off to Canada
I’m excited to be heading to Banff National Park right after that to finally get a chance to shoot there in while it’s a snow-covered winter wonderland. No work, just fun. Can’t wait!
Have a great weekend, everybody!
Thanks,
-Scott


Thanks for the post.
Just one note. You do not need to match PS and LR color spaces, you can have any color space in PS. You only have to check that in PS Color Management Policies, RBG is set to “Preserve embedded profiles”. Once this is set, PS will use the profile defined in LR “Edit in Adobe Photoshop 2019” settings.
Thank you Scott; but I the color space on both Lightroom & Photoshop are the same (I forgot to tell you this on my email to you!). I asked my issue elsewhere (on Adobe community); and they answered: “the version of Camera RAW should be the same on both programs”. And that was the solution!
Thank you;
Alireza.
I had noticed that same issue, but now I know how to fix it. Thanks –
You bet, Dudley. Have a great weekend. 🙂
thank you for the infos.
My main problem is when i use lightrrom images and stcok photos images inside photoshop.
how do you manage the extra space of stock photo,… whose colors shift when you have tuned lightroom and photoshop to work together in prophoto ?
the only way i found is to export lightroom images to TIF srgb and open stock photos images with its own color space or none.
result is a psd in srgb i suppose i add to my lightroom library (oups prophoto again !)
For people having cheap display and printer, it would be so nice lightroom can be set in adobe 1998. even my d300 acmera has this mode too for jpeg.
best regards
marc
The Stock Photos you’re downloading aren’t RAW photos, so they already have a color space embedded in them, probably Adobe RGB 1998 or sRGB if they are Web size (or maybe even if they’re not). When you add them to Lightroom (which by default is in the Profoto space), they don’t grow extra colors that weren’t there to fill that gamut, so that’s not the problem. I would change Photoshop’s color space to match the color space of the stock photos (open one directly in Photoshop; go to the color settings and it will show you what their color space is). That way, when you move between the two, there won’t be a color shift (both are still in Adobe RGB or sRGB — they can’t take on the properties of Profoto RGB), and you don’t have to go through that whole export as TIFF thing. Give that a try. Hope it helps. 🙂
Thank you Scott.
In my case i have a portrait, a dog,… in lightroom i want to extract in photoshop and put on a stockphoto background so i open the two raw as layers with LR edits into photoshop set in prophoto mode.
so now i need to import as smart object (file place embedded) the stockphoto background which is srgb or adobe1998 and some color shift appears.
This is why i exported the two processed raw on my hard disk as jpeg/tif srgb or adobe to open all images in photoshop set to srgb or adobe so three files are in sam space.
is that way of working wrong ?
was it easier to improt stockphoto image insde lightroom and then send three images as layers in photoshop still in prophoto ?
best regards
marc
[…] post Q&A on Lightroom to Photoshop Color Problems appeared first on Lightroom Killer […]
[…] post Q&A on Lightroom to Photoshop Color Problems appeared first on Lightroom Killer […]