

Hi, gang, and happy Monday. I have a follow-up to my post from last Monday titled, “The Shocking Truth About Lightroom’s HDR” (link) after hearing from Adobe’s Lightroom team regarding my post. They noted there are several reasons for the sharper HDR results I was getting from Photoshop’s HDR Pro in 32-bit mode and some disadvantages to using Photoshop to merge your HDR images that I did not mention in my post.
First, the sharpness issue
What the Lightroom team pointed out was when your RAW images are imported into Lightroom, there is a default amount of capture sharpening already applied to the image, but when you use the “Tone in ACR” option when leaving HDR Pro in Photoshop, it applies another round of that sharpening on top, resulting in a sharper overall image. That’s because it’s been sharpened twice; once on Import into Lightroom and than again when the RAW image is opened in Adobe Camera Raw.
OK, this part is me talking: Lightroom does apply capture sharpening when you import any RAW image — this has been true for as long as I can remember. In fact, the default amount of sharpening has been increased with the introduction of a new default RAW profile in the most-recent Lightroom Classic update (the new default RAW profile Adobe Color boosts the initial capture sharpening Amount from 25 to 40). So, essentially you’re applying a default amount of 40 sharpening in Lightroom’s Detail panel, and then another 40, in Adobe Camera RAW’s Detail panel, and so the Lightroom team noted that you could just increase the Amount of sharpening in Lightroom to 80 on your bracketed images and effectively achieve a similar amount of sharpness without having to jump over to Photoshop at all.
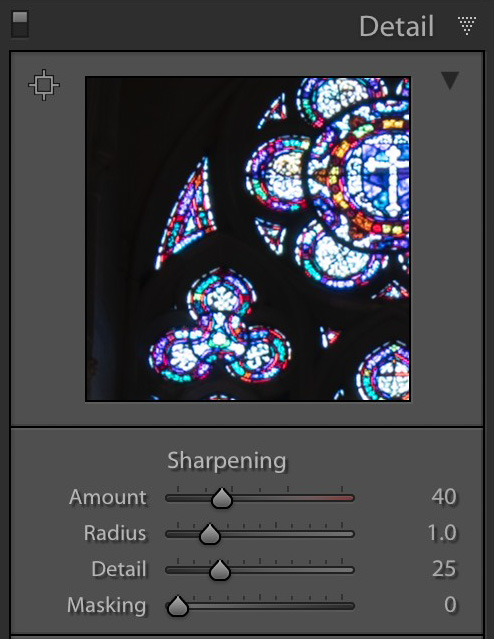
Above: The default sharpening applied (+40) with the new default RAW profile Adobe Color.
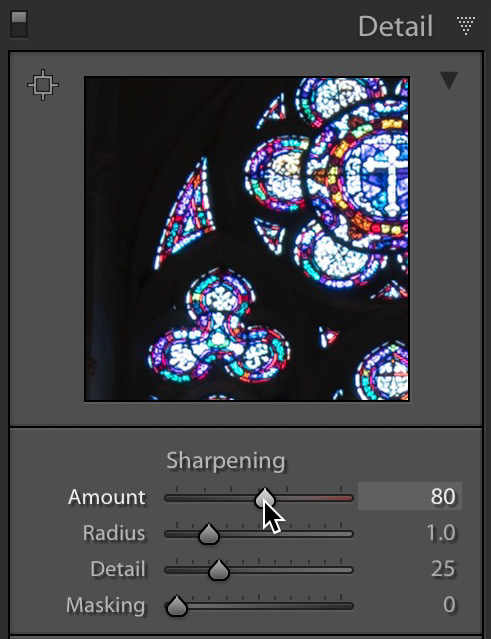
Above: Increasing the sharpening amount to 80.
But it’s more than just sharpness
The other thing that I noted is the color rendition seems more accurate in HDR Pro, and the Lightroom team pointed out that HDR Pro in 32-bit mode handles the highlights differently than does Lightroom (Lightroom’s HDR has “hotter” highlights). Through my own tests, I found that reducing the Highlight amount in Lightroom to around -35 gets you close (not exact, but close) to the results of Photoshop’s HDR Pro in 32-bit mode. So, you put those two things together in Lightroom: bumping up the Sharpening amount to 80 in the Detail Panel, and reducing the Highlights to -35, and you’re pretty close to the result you’d get in Photoshop’s HDR Pro in 32-bit mode.
But Lightroom has another advantage
They pointed out that your result from Photoshop’s HDR Pro in 32-bit mode is a 16-bit TIFF image (it is no longer a RAW image), but when you create your HDR within Lightroom, the result is actually a RAW .dng file with all the properties and advantages of a RAW image, so that’s a big advantage of compiling your HDR in Lightroom.
So, now we know
While it’s still true that Photoshop’s HDR Pro 32-bit process does create a sharper and more accurate color rendition by default (the key phrase there being “by default”), the Lightroom team pointed out that you can easily tweak Lightroom’s settings to give you a very similar result, saving you a trip to Photoshop. You could also create a simple Develop Module preset that bumps the sharpening amount up to +80 and backs off the Highlight amount to -35 and then the process is literally just one click, and the results is a RAW dng file with more editing headroom if you continue your edits.
Thanks to the LR team
A tip of the hat to Lightroom Product Manager Sharad Mangalick and the Lightroom team for pointing this out.
Here’s wishing you all an awesome week!
Best,
-Scott
P.S. Friday my Lightroom Seminar is in Washington DC. Hundreds of photographers are already signed up — don’t miss out. http://kelbyonelive.com
Is there a way to create an Action to batch process several different HDR brackets from LR CC over to PS CC for 32-bit, have a preset amount of tweaking in Camera RAW and then back to LR for final adjustment? OR even just a single set of brackets for one image even? Thank you!!
Hi Scott,
Thank you for these articles – very helpful. Can you let us know if LR Classic updates “fix” this issue or should we keep using a sharpening +80 and Highlight -35 Dev preset.
I really enjoyed reading. Thanks for sharing.
I’ve been less than enamored with LRs HDR and was going to try your PS tweaks. This is even better if I don’t have to leave LR!
Thanks for the follow up!
Phew – I already do the sharpening so changing my highlights preset is all I need to do.
Thank you Scott
https://rickmcevoyphotography.com/
Hi Scott. First of all, thanks for the tip, the result with PS is much better. I didn’t understand the highlights things very well. By default, I use autotone in LR when doing the HDR, so it is already reducing highlights, but at least for me results are very distinct between the two. When they say applying -35
is absolute value or 35 less than then the autotone setting? Anyway, I found that the PS method is much more natural looking and easier to tone than the LR one, that was an amazing tip!
I think that the best part of this article is that Adobe is watching and listening to users.
Very useful to have that clarified..
Thanks very much for the followup discussion. Following your post last week, I re-processed an HDR/PANO image I had been working on using the PS route. I noted that while the image was perhaps slightly better, the resulting tif file was enormous – about 2.5 GB – making it difficult to work with. That may be warranted at times, but the adjustments you mention may make LR the better choice in most cases. Thanks again Scott!
You bet, Gary. 🙂