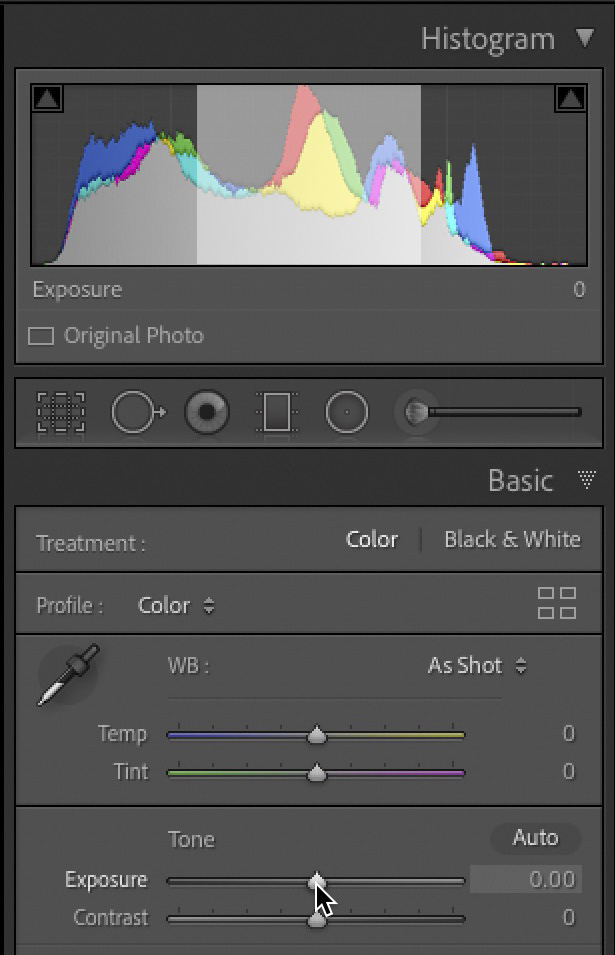
If you’re curious which sliders control which parts of your image, Lightroom has a way of showing you. Just hover your cursor over one of the sliders (as seen below where I’m hovering over the Exposure slider). The tonal range that particular slider affects shows up highlighted in the Histogram in light gray (as seen below).

You can file this part under “nice things to know,” but while we’re here at the Exposure slider, look at how much of the overall tonal range of your image is affected by this one single slider. While we say the Exposure slider controls the all-important midtones of your image, you can see from the highlighted area above it also affects the upper shadow areas and the lower highlights. That’s one powerful slider, and why moving it has such an effect on the overall brightness of your image. Anyway, I thought you might find that helpful. 🙂
Next week, Join Us At The Outdoor Photography Conference
It kicks off next Monday with a pre-conference session, and then it runs all Tuesday and Wednesday in two separate training tracks. Remember — you get full access to all these sessions for an entire year after the conference, so even if you can’t make it next week, you can watch it any time in the next full year, which is awesome.
Hope you have a fantastic weekend, and I hope you’ll stop by again next week. 🙂
-Scott
P.S. There’s Been a New Development In The Chicken Sandwich Wars. I wrote about it over on my scottkelby.com blog today. Here’s the link if you’ve got a sec.


I guess this tip is not for Lightroom Classic. On my system I see the opposite effect (with apologies!). If I hover over the histogram the relevant tonal control is highlighted!
The 5 items (contrast isn’t…) in the Tone panel light up the histogram faintly in the appropriate regions if you hover over the scrubby knob on the slider. If you move over the areas of the histogram, it will light up the slider row and keyword which affects it as you noted.
I often adjust my exposure directly on the histogram, it’s my preference. I’ve shown this trick to a lot of people who didn’t know you could just go to the graph and slide it around… then if there’s some fine tuning to do, I’ll go down to the sliders.
Ditto Fausto Rowland’s comment. Clearly, someone other than Scott wrote this headline!
I love that it’s short advice, but a pretty enlightening one! Thanks for sharing this, it makes me want to explore my Lightroom more.
Great post. I have known new things and It will surely improve my photo editing quality by LIghtroom. Thanks.
[…] post Which Lightroom Sliders Effect Which Parts Of Your Image appeared first on Lightroom Killer […]
The tonal range that particular slider affects shows up highlighted in the Histogram in light gray (as seen below).
Tonal range not showing up in my Lightroom. How do you get it to show up? Is there a setting somewhere for that?
Hover over the scrubby knob on a Tone section slider and it should faintly light up a section of the histogram which it affects.
Sorry I didn’t see your reply. I tried it and did see the faint light up on the histogram. Very faint. Not like it is shown here. Can hardly see it. For me it is not very useful. Thanks anyway for you help.
Scott may have played with the contrast on his screenshot, or maybe it stands out more naturally on a Mac (I’m a PC user). Glad to help.
Guess my question is not worth replying to. Oh well.
You do realize that you replied to a reply on your comment, right? 🙂
Sorry. So whats the answer to my question above?
Do you not see the reply from NotoriousRLS directly below your question?
Really Scott, does it actually say “effect” in the title of the article? 🙂
Hi, good info, thanks!